
Assuming that you’ve been after my blog for some time, you may recall the embellishment photographs I posted on what I call the “House in my mind”. This is the house that I imagine as the “best home for me”. It’s not very good quality, large, or stylish – simply a house that has every one of the parts to accommodate my own style. I watched the video on the screen and the huge grin a stone fireplace could be mine and no stonemason.
The interest for a particular Electric Fireplace Inserts With Heater is a sensible indication of its ability to fill the situations for which it was coordinated.
Table of Contents
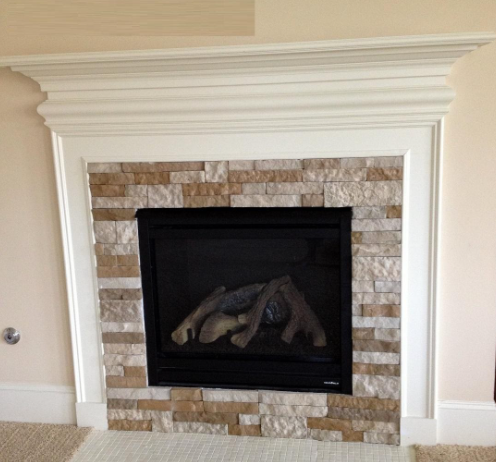
Fireplace Makeover – After
AirStone is accessible in two tones: I utilized Autumn Mountain. It appears as though a genuine stone yet is a lot lighter. It doesn’t look like greenery or modest renditions of stone exteriors. After AirStone has been on the lookout for some time, the organization has had a great deal of criticism as light stones break-in encloses travel.
Subsequently, they made the stones heavier and denser, which presently makes them harder to cut. For the subsequent smokestack, I made a couple of years after the one displayed in this post, I needed to utilize my miter saw to cut the stones. You can see and peruse the second fireplace I made in this post: Stone Fireplace and Mantel Makeover.
Required Supplies:
- You can purchase AirStone at select Lowes stores. I really wanted 1 box of Flat Edge stones and 1 box of Corner Edge stones
- Wet Rag and warm water
- 1 tub of AirStone Adhesive
- Hack Saw with another edge or a power miter saw with a smooth cutting edge.
- Clay Knife
- Pencil
Step 1
Clean the surface that you will apply the stones to and let dry.
Step 2
AirStone comes in 3 distinct advantages Natural Edge is utilized where the side of the stone will be uncovered. Level and Cornerstones. There are likewise wide stones in each crate so you can make a sensible stone exterior.
Step 3
You need to stir up the shades to make a practical look. There are little knocks on the sides of certain stones. Scratch them off – they are leftover from the trim cycle.
Step 4
Sort out your overall situation. I stacked stones to perceive how the blend of size and shading variety would look prior to applying them. You don’t need the edges of the stones to fix up – cut them with a hack check whether important to change where the edges fall. I defined dark boundaries on the photograph beneath to show you where they ought to be cut.
Step 5
For a divider establishment, you may not require foundations, yet for my fireplace, I really wanted them to circumvent the inward edge. AirStone has a “Class A” fire rating and is protected to use around run-of-the-mill fireplaces.
At the point when I got to the sides of the fireplace, I applied the corner pieces first. Exactly when the front was covered, I added stones to the inside corner to make them even. You can see this in the last photograph of the post.
Step 6
Right when I did this fireplace, the stones were made exceptionally rather than what they are available. Cutting the stones was pretty much as simple as cutting a dry French roll, yet rather than a bread blade, I utilized a hacksaw with another sharp edge.
Step 7
Use a pencil to stamp the size of stone you truly care about.
Step 8
Cut it on the face side of the stone, not the posterior. It is not difficult to cut.
Step 9
Ensure the mainline is level, for it will be the establishment for every one of the lines above it. I began to do this and acknowledged it when I got to the highest point of the fireplace. All things considered, I began at the top and worked down, so the top stones would be the ideal fit. Doing it this way gave a smidgen of a test, yet I sorted out some way to get around it so the stones would not descend as they dried.
Step 10
To connect the stones utilize a clay blade and a thick layer of cement to the rear of the stone-like you are icing a cupcake, not buttering bread. Then, at that point, press the stone immovably onto the divider permitting the glue to pack. Assuming you get cement on a stone – utilize a wet cloth and warm water to wipe it off.
Also read Step By Step Make Your Fireplace Makeover Using Fireplace Airstone


